A risk matrix is a tool used to assess and prioritize the potential risks associated with a project. In the context of a web accelerator project, the risk matrix can be used to identify and prioritize the potential threats to the successful completion of the project.
The matrix typically consists of two dimensions:
- The likelihood of the risk occurring.
- The consequence if it does occur.
Each risk is then plotted on the matrix, allowing for a quick and easy assessment of which risks are most significant and need to be addressed first.
- Determine the risks you want to assess: This can be done by identifying the key areas of your web accelerator project that may pose a threat to its success.
- Assign a probability and impact score to each risk: The probability score determines the likelihood of the risk occurring, while the impact score determines the potential impact of the risk on your project.
- Plot the risks on the matrix: Plot each risk on the matrix by placing its probability score on the x-axis and its impact score on the y-axis. The resulting plotted points will give you a visual representation of the risks and their relative importance.
- Define the risk levels: Divide the matrix into different risk levels (e.g., low, medium, high) based on the probability and impact scores.
- Prioritize and manage the risks: Based on the risk level, prioritize the risks, and create a plan for managing them effectively.
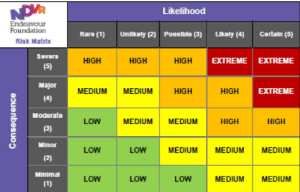
Below is an example of the likelihood and consequence chart from a risk table, that was used for one of our clients.
We followed these steps to create a risk matrix:
- Go to our risk table.
- Create fields which should be ideally datatype = choice fields, with
values for likelihood = rare, unlikely, possible, likely, certain and values for consequence = severe, major, moderate, minor, and minimal.
- Create a new column Risk Rating to accommodate these values.
- Data type for this column should be a multiple-choice column with values Extreme, High, Medium, and Low.
- Place these 3 columns on your form and make Risk Rating column read only.
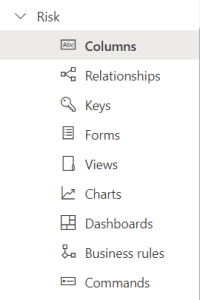
Once we are done with creating all the fields, we’ll move to the conditional part of it so for that we need to go to Business rules under Risk Table as shown below.
- Click on New Business rule.
- Add conditions.
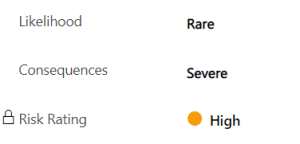
- In the property, pane add your column name (Consequence set its value to severe and for likelihood set its value to rare).
- Add set field value.
Select risk rating column and set its value to High as shown below.

- Perform these actions for different conditions and save your business rule.
- Once saved go to your accelerator and check.